Benchmark Classic to Benchmark Next-Generation
Moving from Benchmark Classic to Benchmark Next-Generation opens the door to a more streamlined and robust email marketing experience. While many features will feel familiar, the new Benchmark introduces several key changes to how you manage contacts, design emails, and authenticate domains. This guide will walk you through the most notable differences and show you where to find the tools that you’re used to.
Current Benchmark Classic users can set up a new Benchmark account using their existing email address. The Classic and New Benchmark do not share account information.
Topics Covered in This Article
- Contact Management
- Image Gallery —> Uploads
- Email Builder
- Email Authentication
- User Management
- Sending Emails the New Way
- Main Advantages of the New Benchmark
Contact Management: From Lists to a Central Database
One of the most significant changes in the new Benchmark is how contacts are imported, stored, and managed.
Benchmark Classic
Contacts were imported and stored in multiple lists. The same contact could also exist in various lists, and with different data points.

Benchmark Next-Generation
Contacts are imported directly into the central database. Making it easier to manage and search for individual contacts.

Lists in the new Benchmark function, similar to the Classic Benchmark Segments, they are constructed based on specific contact criteria.
- You can create lists based on tags, created date, modified date, any data within a contact field, and also create lists based on email engagement.
Tags
Tags are a powerful new feature in the updated Benchmark platform. You can add tags to individual contacts, entire groups, or even apply them automatically during the import process.
Benefit
Cleaner organization and the ability to target contacts with greater flexibility.
Best Practice
Consider applying tags during the import to make future filtering and segmenting faster.
Helpful Resources
Image Gallery: Now Inside the Email Builder
In the new Benchmark, the image gallery is integrated directly into the email builder and labeled as Uploads. To access the Uploads folder, you will need to open an unsent email.

Benchmark Classic
The Image Gallery was located outside the email builder, but you could still access it while editing an email.
Benchmark Next-Generation
The Image library is built into the builder, allowing you to upload, organize, and edit images without ever leaving your design.
Bonus: Free Images & AI Image Generator
In addition to your uploads, you'll have access to a collection of free stock images and the AI Image Generator to create custom visuals. Any images you use or generate are automatically saved to your Uploads folder for easy access.

To create an AI image:
- Enter a detailed prompt describing the image you want.
- If the AI suggests more detailed prompts, you can either use one of the suggestions or stick with your original idea.
- Browse the images generated by AI and select your favorite.
Email Builder
Some of the features you are used to have changed names or locations. We also added a few more options to make email building faster and easier.
Here are a few of the differences and improvements:
Differences
Preview Email Options
You’ll find the Preview and View Mode options at the bottom-right corner of the email builder. This section not only lets you preview your email but also switch between desktop and mobile editing modes.

- Undo/Redo
- The Undo and Redo options let you quickly reverse or reapply recent changes to your email design.
- Preview
- See exactly how your email will appear in inboxes on both desktop and mobile.
- Desktop
- Edit and style your email for desktop view. This mode is selected by default.
- Mobile
- Edit and style your email specifically for mobile devices—a valuable option since most subscribers open emails on their phones.
Test Email
The Send Test Email option is located in the Email Checklist. This allows you to send a test version of your email to up to five email addresses to review how it looks before sending it to your full list.

Saved Blocks
Similar to the Classic Benchmark, you can save sections of your email to reuse in future templates. They are saved as Blocks and can be found in the Blocks tab.

Improvements
Smart Buttons work like the Button block in Classic Benchmark, helping you draw recipients’ attention and encourage clicks. In the new Benchmark, the Button element takes it a step further by utilizing AI to enhance your calls-to-action or even generate brand-new ones from scratch.

Simply enter your prompt, choose a tone, and let AI provide tailored CTA suggestions for you to use.
Ability to add a background image using a dedicated block. Background images are added through the Row Properties within a block. Click here to learn how.

The Audit checklist serves as a tool for reviewing emails before sending. The Audit highlights issues such as missing URLs, missing ALT Text in images, empty text blocks, and more. Click here to learn more.

Key Difference
- The Send Test Email option is now located in the Email Checklist instead of directly in the builder.
- Edit your emails in mobile view, making it easier to design with mobile readers in mind.
- New Content blocks.
- HTML and a Countdown timer.
Email Authentication
Along with some of our email authentication vocabulary, the type of records used and the authentication process have changed to make setup easier and improve deliverability.
Benchmark Classic
- Required 2 CNAME records and a TXT DMARC to your domain's DNS settings.
New Benchmark Email
- Uses one NS record or multiple records for verification. Click here to learn how to verify your domain.

Subdomain
Another significant improvement is that all email sending uses subdomains. Sending from a subdomain helps protect your root domain’s reputation and boosts overall deliverability by separating your marketing emails from your primary domain activity.

Helpful Resources
User Management
Gone are the days of sharing usernames and passwords.
In Classic Benchmark, there was no option to invite additional users to your account. The only way to give someone access was to share your login credentials or create a sub-account—neither of which solved the problem of secure access.

With the New Benchmark, each person can have their own login, eliminating the need to share sensitive information. These users can perform a range of tasks, from uploading contacts to creating and sending emails. However, they cannot change your subscription plan or add/remove other users.
Helpful Resources
Sending Emails the New Way
One process that may seem different is scheduling and sending an email. While it remains simple, the steps and options have been improved. When scheduling the delivery of an email from the email creation process, you will need to select a contact list. However, if you want to send an email to all of your contacts, you can use the option in the Contact dashboard. Below, we will list the two ways you can send an email.
There are several options to send an email.
Option 1
The more traditional way.
- Create an email.
- Complete the email details. This includes:
- Adding a subject line,
- Selecting a sender name, email address and reply-to email.
- Selecting a contact list.
- Schedule or Send Immediately.
Option 2
This process is new. You can create an email beforehand or start from scratch. In the example below, we will send an already created template.
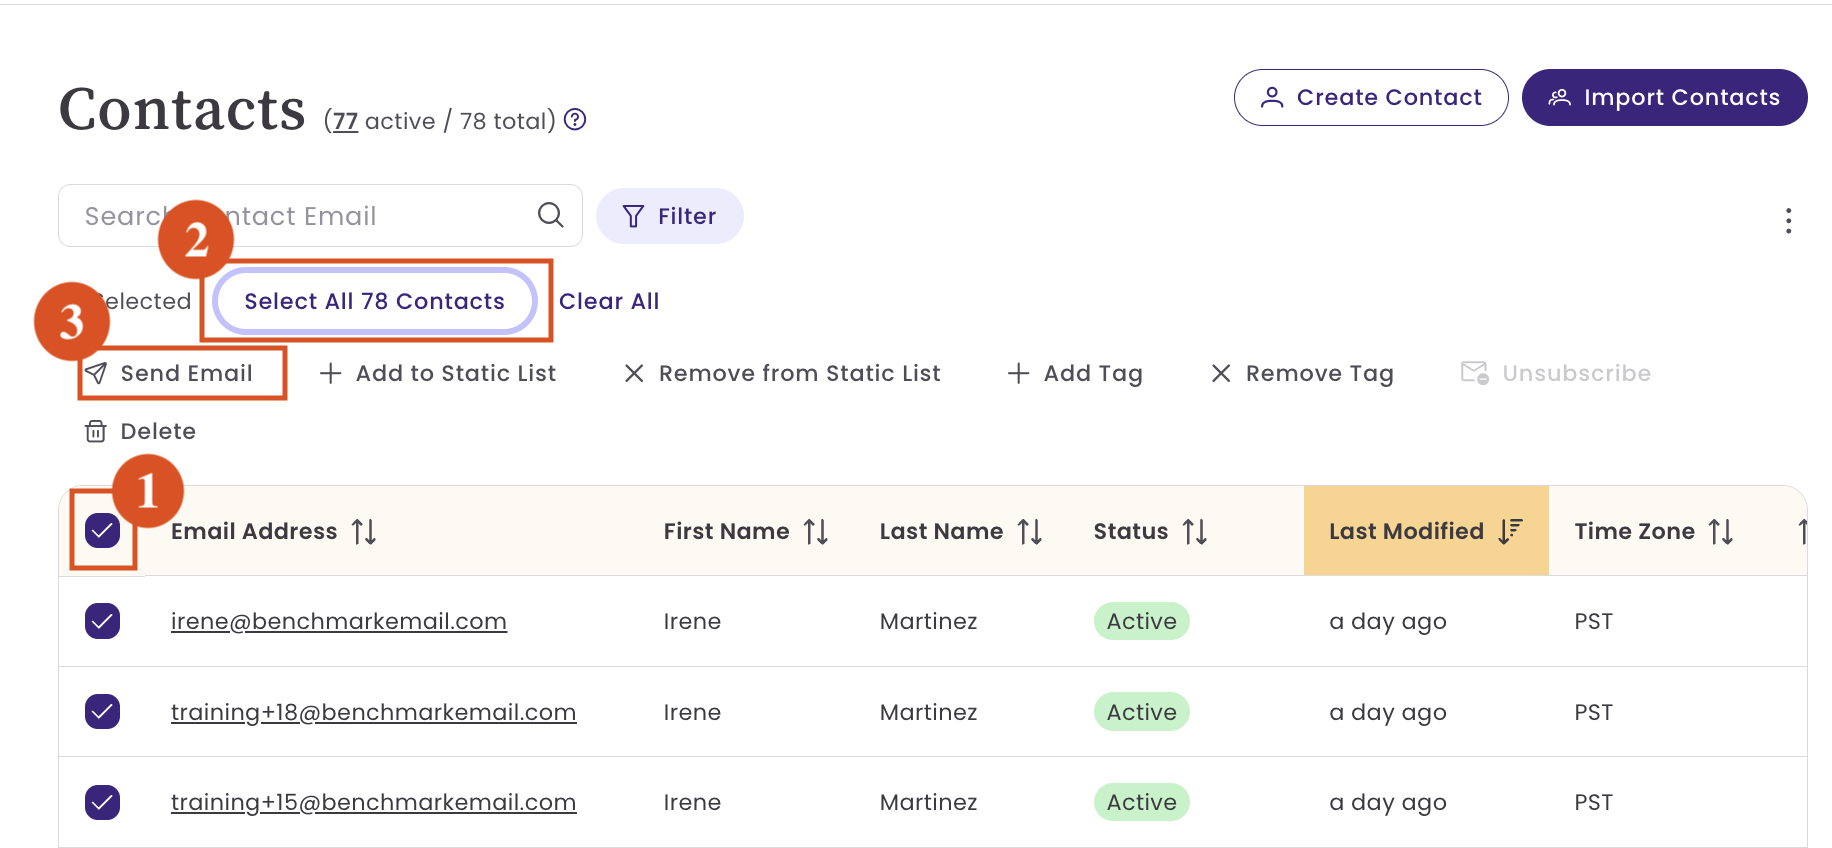
Start by going to your Contacts dashboard.
- Click on the checkbox next to the Email Address
- Then click Select All Contacts.
-
Now, click on Send Email.
- In the next screen, select your email template. If you have no emails created, you can create a new email in this step by selecting Start From Scratch.
- When you select an existing email template, you will have the option to make final edits before sending.
- If all looks good, select Save and Next.
- Next, complete the email details.
- Add an email name; this is optional and is only seen by you.
- Add a subject line.
- Add your sender information.
-
The contacts will already be selected here, but you can edit this section by removing the list of contacts selected and selecting a new contact list.
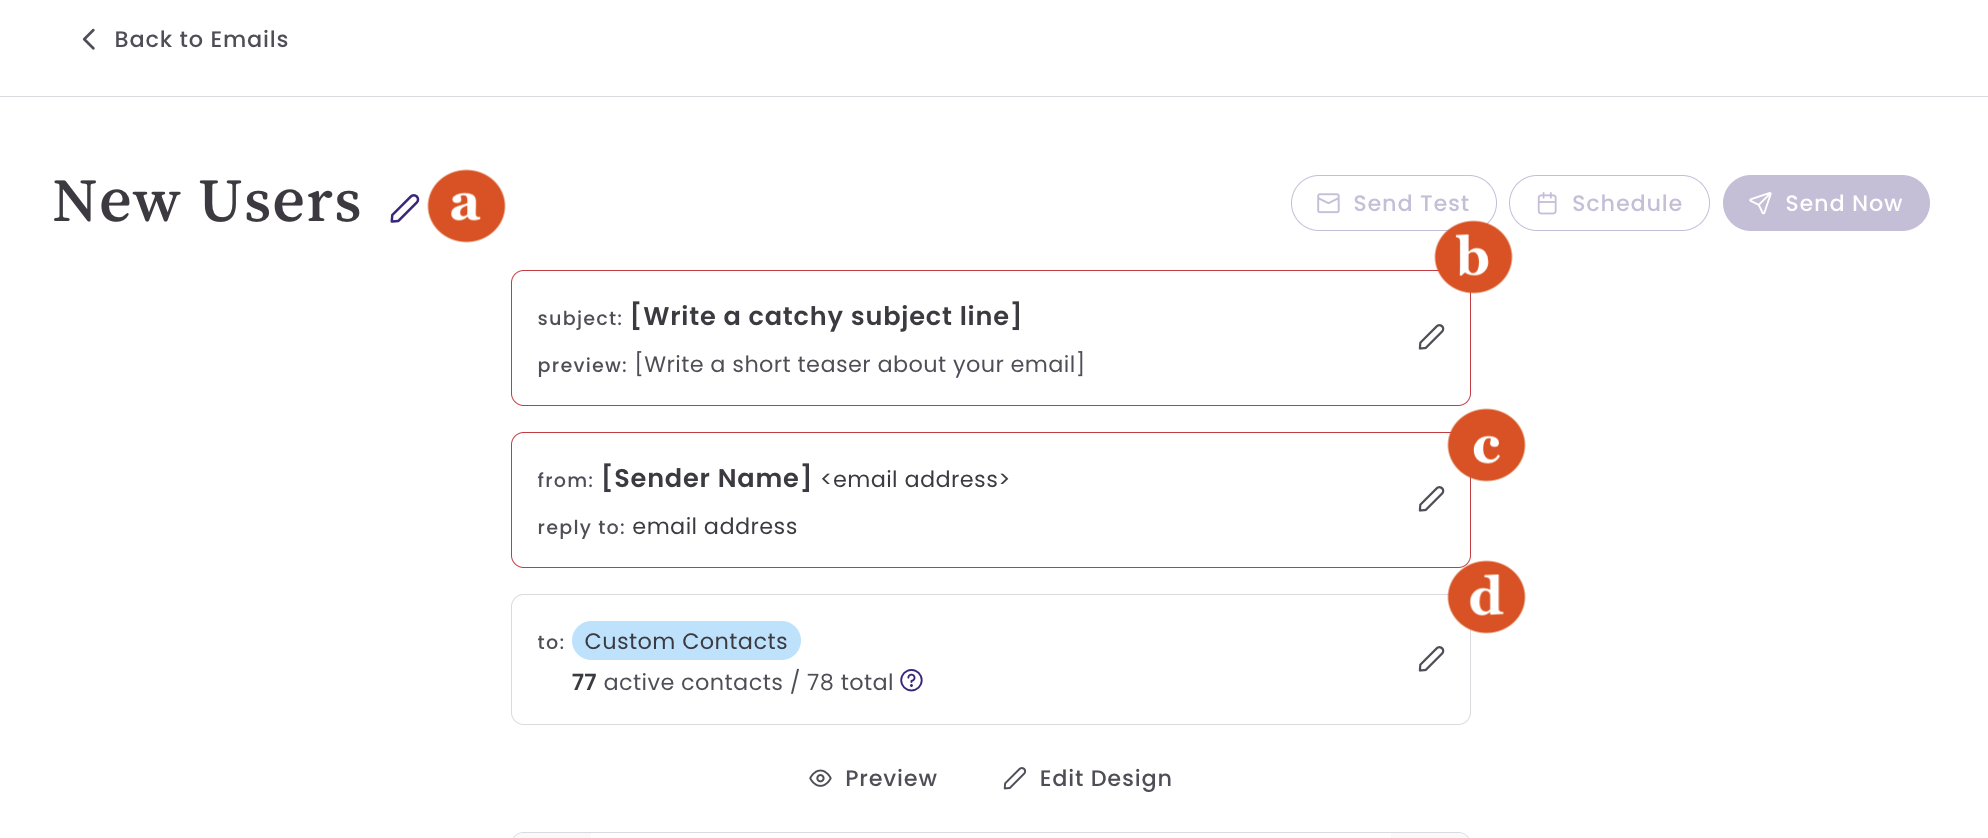
- Finally, send yourself a test email, and when you're ready to send it, choose Schedule or Send Now.


Option 3
Similar to option 2, but instead, you use the Filter options to select a specific group of contacts.
-
Select and apply filters.
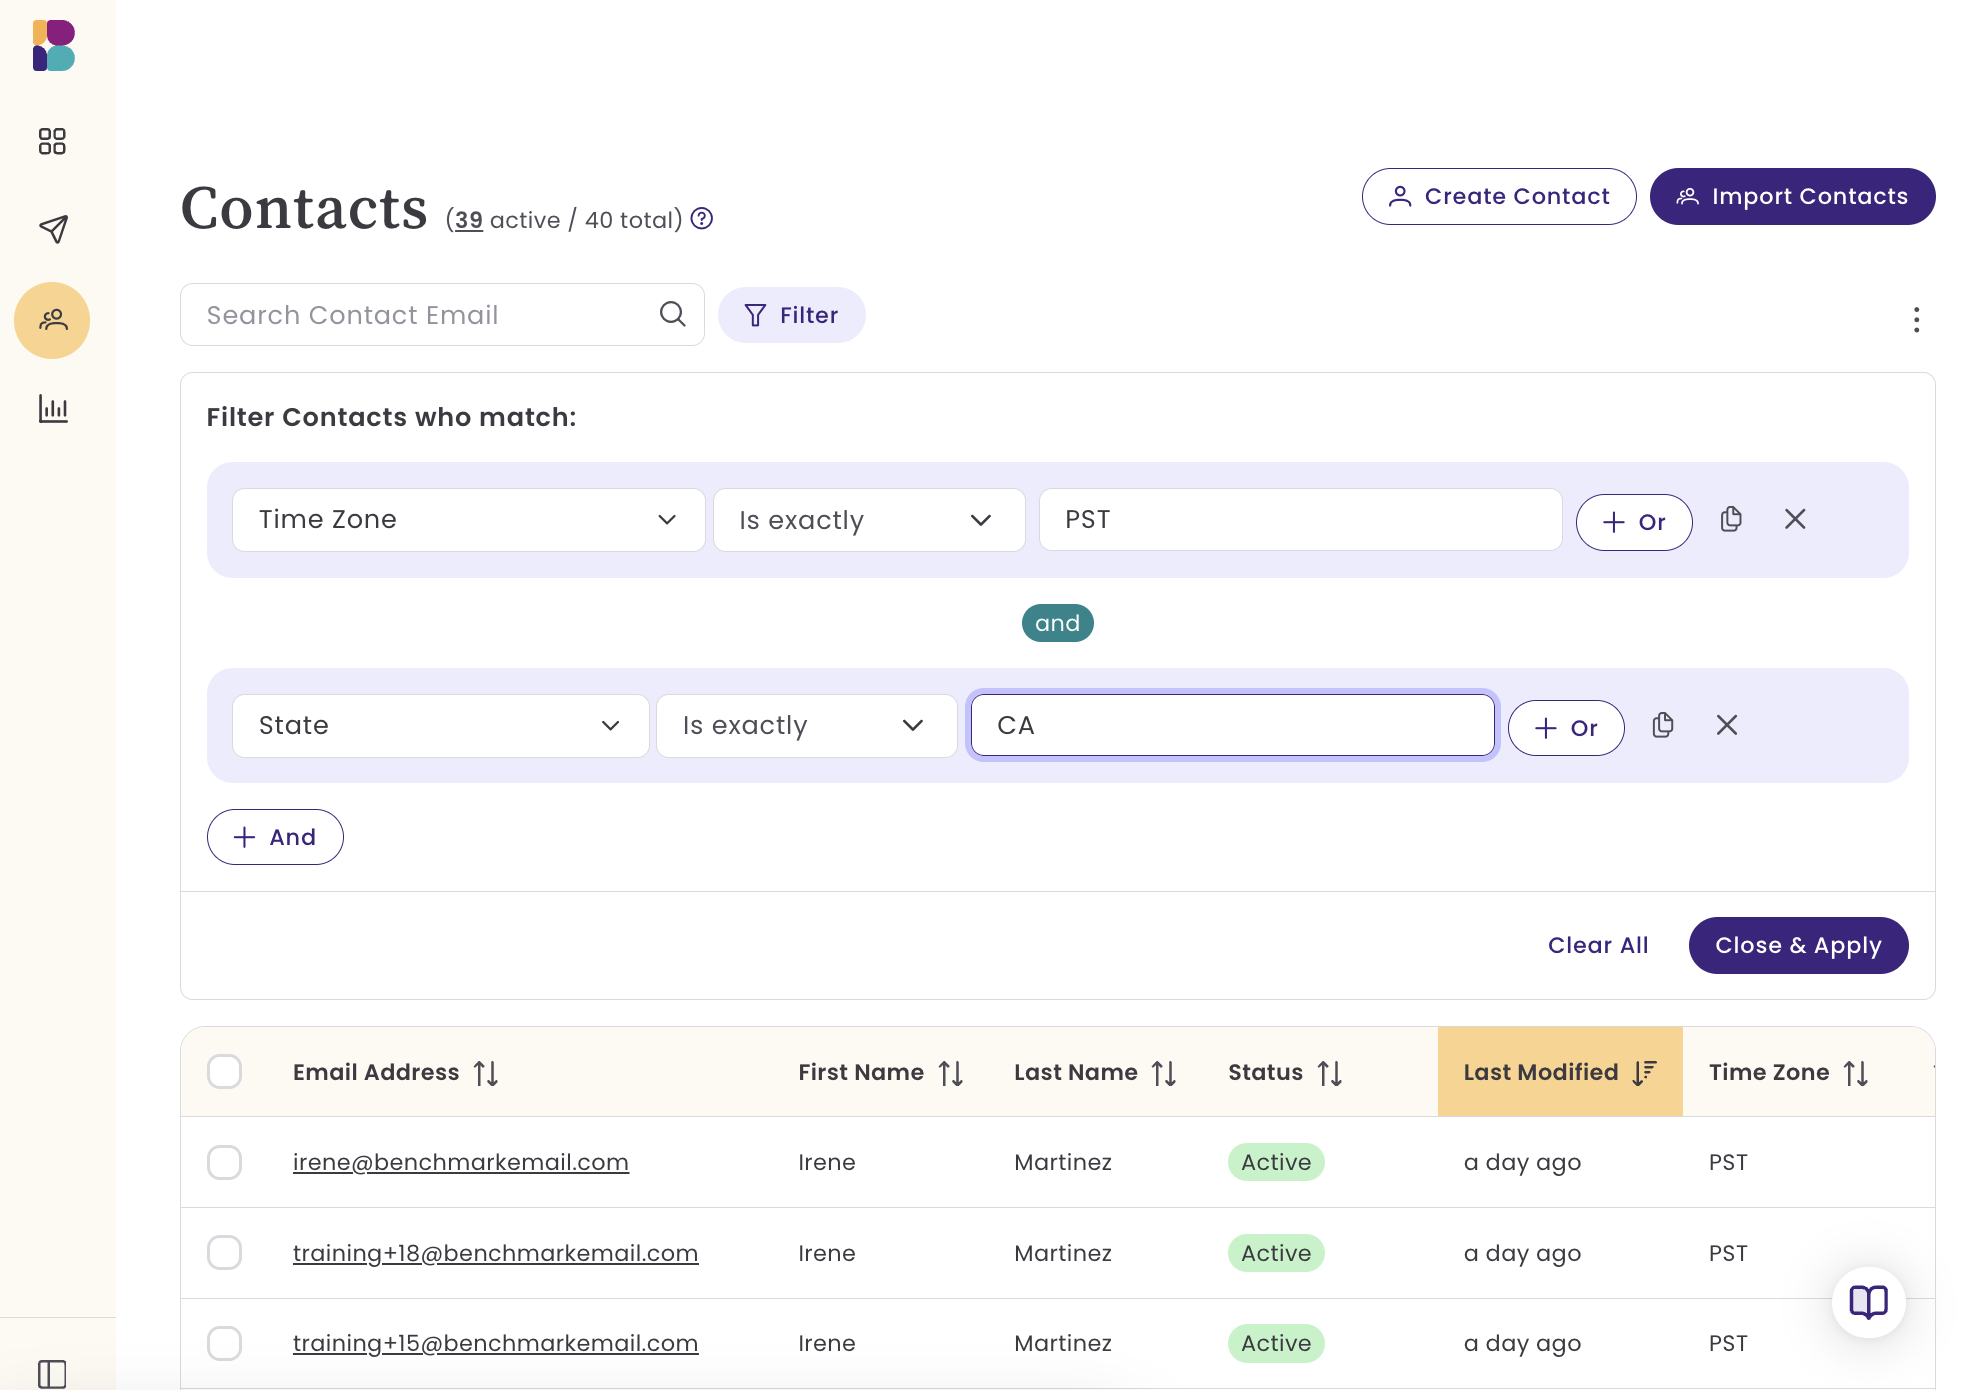
-
Select all of the contacts, and select Send Email.
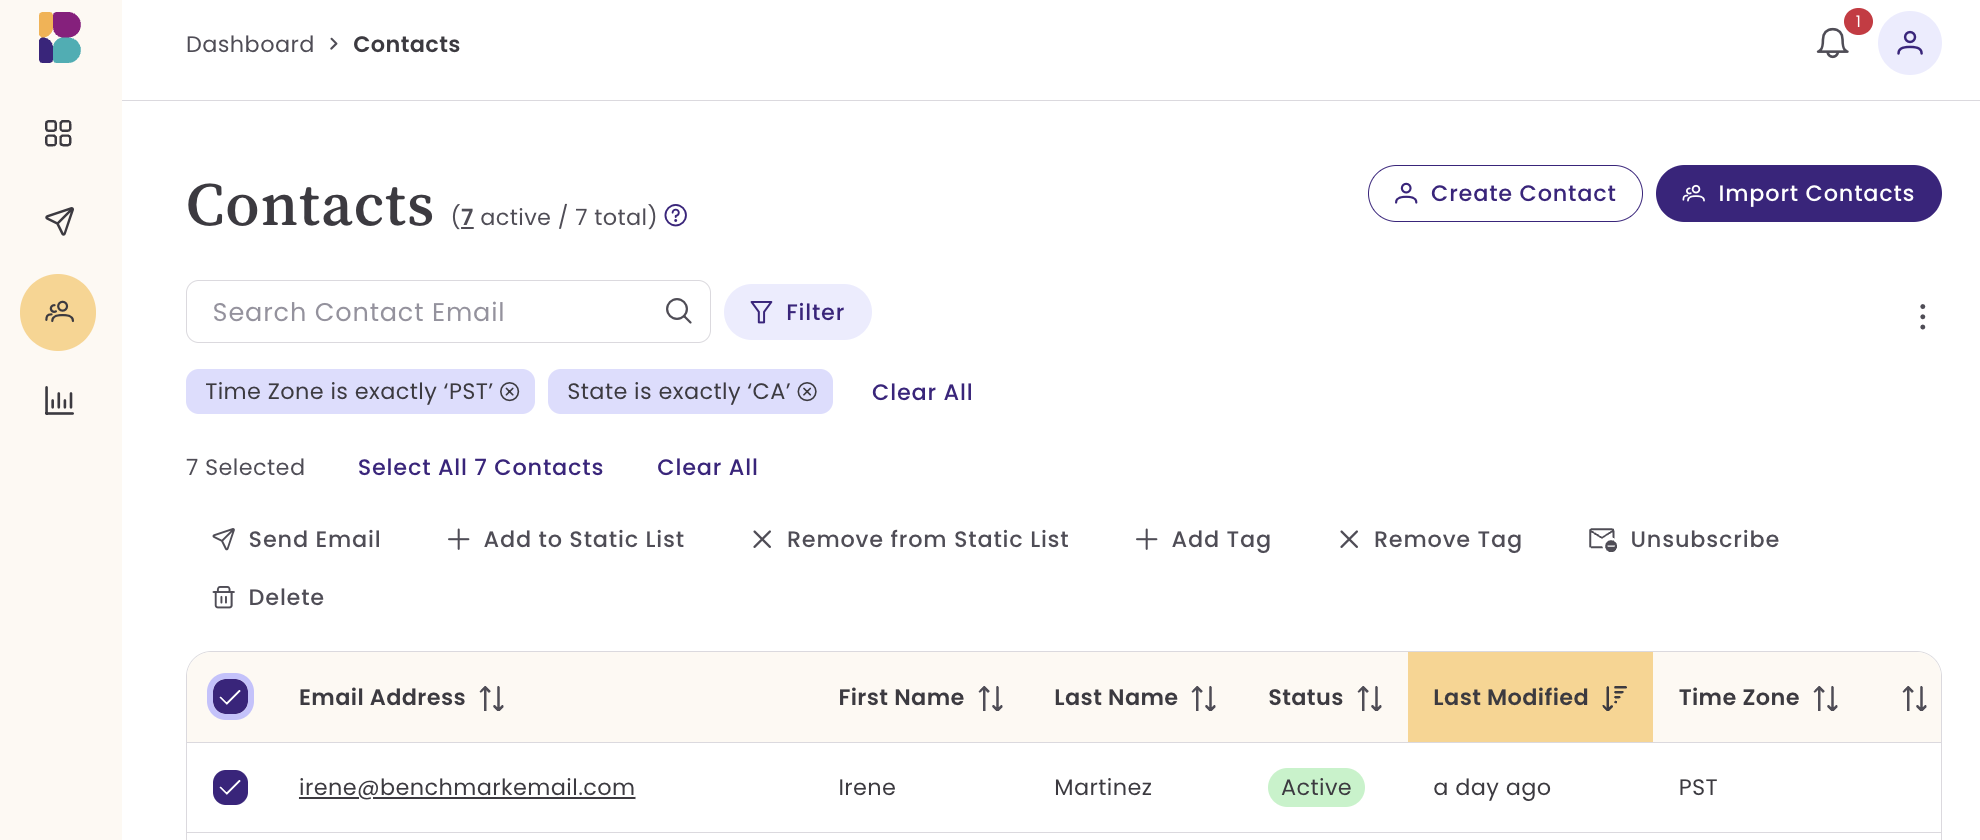
- In the next screen, select your email template.
- Fill in Email Details.
- Schedule or Send your email.


Option 4
If you have previously created an email list, you can go to the List dashboard, select one or multiple contact lists, then select Send Email and follow the same steps for Options 2 and 3.

Main Advantages of the New Benchmark
- Tags for Contact Management: Quickly filter and group contacts.
- Central database: Easy sorting and filtering.
- Filter by contact data or email engagement.
- Search by name or email
- Multi-user support: Invite additional users to your account. Users can upload contacts, create and send emails.
- Contact Lists: Create lists based on your customers' data, and quickly create custom fields to store additional data.
- Contact Profile: In the Classic Benchmark, you were limited to contact fields, whereas in the new Benchmark, the contact profile provides an email engagement view.
- Simplified Domain Authentication: One NS record and subdomain sending for better deliverability.
- Image Stock and AI Image Creator: Quickly create new images using the AI Image Creator or pick a stock image.
- Smart Buttons: Enhance your CTAs or create a new one with just a few prompts.
- Sign-in Options: Quickly sign in using Google login, saving you time and keeping your data safe.
- Email Reporting: The overall reporting gives you a 90, 60, or 30-day snapshot of your account.
- Real-time activity stream.
- App View Preferences: Choose from dark and light formats
Next Steps for Classic Users
- If you decide to try out the New Benchmark, you can start by importing your contacts.
- Apply tags during or after import to prepare for segmentation.
- Explore the new email builder to discover background images and integrated image management.
- Update your domain authentication with the single NS record for better deliverability.