Getting Started
We understand you're excited to start sending emails, but first, let's set up your account. In this article, we'll cover the areas you must complete before you can email your contacts and the options available to set up your account.
Topics covered in this article:
- Email Settings
- Add a Reply-to email, set your footer to comply with anti-spam regulations, and add your domain.
- Account Settings
- Review your profile information, manage your contact fields, set your account style preferences, and manage account users.
- Plans and Billing
- Review subscriptions, change payment options, and cancel subscriptions.
- Contacts:
- Upload a list or add individual contacts
- Creating Emails
- Set up your first email using our premade templates or create a template from scratch.
BEFORE GETTING STARTED
- To send emails through Benchmark Email, you need to add and verify a sending domain. Otherwise, your emails will be sent from our shared domain, benchmarksend.com.
- Added users must create an account password using the link sent to them via email. They will not have access to their account if no password is created.
Email Settings
In Email Settings, you can add new reply-to emails, customize your email footer, and, most importantly, add your sending domains.
Reply-To Emails
Reply-To emails are used when recipients respond to your messages. The inbox for the reply-to email receives these responses. Benchmark Email does not monitor email replies. You can have up to X reply-to emails in your account.

Adding Reply-To Email
- Click on the + Add Reply To Email.
- Add the email address.
- Confirm your choice.
- A verification email will be sent to the email address, and they will need to verify the email address.
- During this time, the status of the email will be set as Pending Verification.
Once verified, the email's status will change to Verified.
Removing a Reply-To Email
- Locate the reply-to email you want to remove.
- Click on the trash bin icon.
- Confirm your choice by clicking Yes, Delete.
Deleting a reply-to email can not be reversed. Once the email is deleted, it will be removed from all email sending options. If you need to re-add the email, use the Add Reply To Email option.
Footer
To comply with anti-spam rules, your address is included in the footer of every email you send with Benchmark Email. Before you schedule or send an email, you will be instructed to fill in your company's physical address. Once this information is completed and saved, you can find it in the Email Settings, Footer Section.

To edit the Footer information, click the edit option, add your changes, and click Save. Once saved, the fields can not be left empty.

Domains
Before scheduling emails, you'll need to add and verify your domain. This requires adding an NS record to your domain's DNS settings. If your domain provider does not support NS records, domain verification won't be possible, and you won’t be able to send emails through Benchmark Email. If you are unsure who your domain provider is, click here to find your domain's registrar for details.
If you do not own a domain or can not edit the domain's DNS settings, Benchmark will send your emails from our shared domain, benchmarksend.com.
This process requires you to complete the following.
- Add your domain.
-
Create a subdomain; this subdomain will be used to send your emails from Benchmark.
e.g., email.bench4test.com, where email is the sub-domain.
- Add the provided NS record to your domain's DNS settings.
- Once the NS records are added to your domain's DNS settings, return to Benchmark Email and click on Verify Domain.
- During this process, the domain status will change to Verification Pending. Once verification is completed, the status will change to Verified.
To learn step-by-step how to add and verify your domain, click here.
Account Settings
Some areas of the Account Settings are usually filled with information collected during the signup process, such as your account email, first name, and last name.
Use the Account Settings options to customize your account and add more users. Below are the sections provided in Account Settings.
Profile
The profile page displays the account owner's information. You can update the first and last name, but the associated email address cannot be changed. If you need to change the account's email address, contact our support team.

Contact Fields
Custom fields let you store extra contact details beyond the default fields, helping you organize contacts, create targeted lists, and personalize email campaigns.
You can add new fields, modify existing fields, reorder how they appear in your Contact Dashboard, and remove unwanted fields.
Additionally, a custom field can be set up when importing new contacts.
To learn how to manage your account's custom fields, please click here.
Preferences

The preferences page allows you to customize how your account appears to you. Changes will only be applied after saving the changes.
See the different options below.
Data Personalization
Select how your data appears.
Date Format: The selected date format will be applied when scheduling emails. DD represents the day, MM represents the month, and YYYY represents the year.
- YYYY/MM/DD
- MM/DD/YYYY
- DD/MM/YYYY
Choosing the correct format ensures clarity in scheduling, prevents confusion about send dates, and helps you stay organized in your email campaigns.
Number Format:
Number of Decimals:
Theme
Customize the look and feel of your Benchmark account to match your preferences.
Light Mode: Uses a bright background with dark text.
Dark Mode: Uses a dark background with light text.
Device: The Device option will automatically follow the theme set in your device’s operating system. If the OS is set to dark mode, the app will use dark mode; if it's in light mode, it will adjust accordingly.
User Management
As an account owner, you can add or remove users from your account. Users added to the account will have full access to the data within the account.

User Permissions
- Added users do not have the option to add new users to the account.
- A user can have multiple accounts with the same email address but can only own one account with that same email.
Once a user has been added to the account, you can not modify their account's email address.
User Roles
- Account Owner
- User
Status
- Verified: the user has received the verification email and created an account password.
- Pending Verification: The user has not created an account password. Click resend to resend the user verification email.

If a user has trouble receiving the verification email, please contact our Support Team.
Adding New Users
- Click on the Add User option.
- Add the user's email address, first name, and last name.
- Last, click Add.
Next, the user will receive a verification email, which will allow them to create an account password. The account will remain under Pending Verification until they have created an account password.

Removing Users
Users who are removed will immediately lose access to the account once their last active session ends. They will not receive a notification about their removal.
-
Locate the user and click on the Trash Bin option.
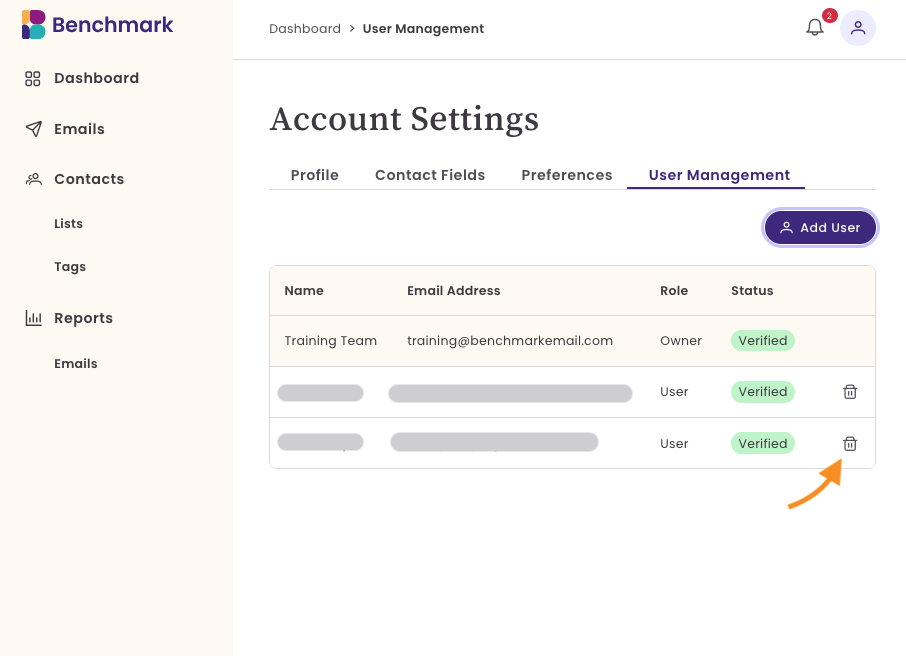
- Confirm you want to remove the user by clicking Yes, Remove.

Plans and Billing
Here you can review the details of your current plan, make changes by upgrading or downgrading, or cancel your account. At the bottom of the page, you’ll also find your plan’s renewal date and a summary of your monthly send limit.
Here you’ll find a breakdown of what’s included in your plan and how much you’ve used so far.
Your plan information includes:
Contacts
- The total number of contacts your plan allows, along with how many you’ve imported. Only active contacts count toward your usage.
Emails Included
- The number of emails you can send each month, plus your current usage.
Cancel Account

This action is irreversible, and deleted data cannot be recovered.
Upload Contacts
Upload a list or add individual contacts. You will need to have a contact list created when sending emails from the email creation process. Otherwise, you can send an email to all of your contacts or a group of contacts from the Contacts dashboard.
Contacts are uniquely identified by their email addresses and are only counted once. Utilize tags and a contact list to categorize groups of contacts.
To add new contacts, click on Contacts and select Import Contacts or Add Contacts.
Import Contacts
The Import Contacts option allows you to import a file of contacts saved on your computer. During the import process, you can add new contact fields to your account, helping you keep your contacts organized.
- Ensure that your file has labeled fields; the labels should be in the first row of your file. If the field labels are missing, the list will not be imported.
- You can only import files in CSV format.
- The contact file can not exceed 100MB.
- Contacts without an email address will not be imported.
Adding Individual Contacts
Skip the import option and add individual contacts. Contacts must have an email address.

To learn how to add or import contacts step by step, click here.
Creating Emails
The best part of all is your email design. Now that your account is set up and your contacts are uploaded, you can begin working on your email.
With our drag-and-drop editor, creating your email is easy. You can design from scratch or select one of our pre-made templates.
Start From Scratch
The Start From Scratch template is completely blank, and you must add sections and content blocks to each section. Style your email with your brand colors, logo, and images.
Templates
Our pre-made templates are designed with filled-in sections, content blocks, images, buttons, background colors, and even email copy. Each section can be modified, and you can apply your own brand colors to align with your branding.
You can save your template and return to edit or send it. Once you are ready to send your email, you can fill out the Email Checklist section with the following details.
Subject: This is the email subject line your contacts will see in their inbox.
Sender Information: This will include the sender name, from email address, and a reply-to email.
Contact List: Choose a contact list that will receive your email. If no contact list is created, you can skip this step and send the email from the Contact's dashboard. Click here to learn more.
To learn more about creating and sending emails, click here.