How to Export Contacts from Benchmark Classic
Easily export your Benchmark Classic contacts and import them to your New Benchmark Email account.
Topics covered in this article:
- Video Overview
- Export contacts from Benchmark Classic
- Import a file of contacts into the New Benchmark
BEFORE GETTING STARTED
- At this time, Benchmark Classic and the New Benchmark are not integrated; contacts must be manually exported from Benchmark Classic and imported to the New Benchmark Email account.
- We recommend that you clean your contact list in Benchmark Classic before exporting.
- The Benchmark Classic Clean List feature allows you to remove bounces, invalid emails, and contacts who have not engaged with your emails.
- To learn how to clean your list in Benchmark Classic, click here.
- If you have multiple lists in Benchmark Email, you can combine them into one list and then export one list. To learn how to combine or copy lists in Benchmark Email, click here.
- If each contact list is specific to a particular group, you can export them separately and then use the tag option during the import process in your New Benchmark account.
- The New Benchmark only accepts the CSV file format; make sure to export the Benchmark list as a CSV.
- Create custom contact fields before importing your contacts. To learn how to create custom fields in the New Benchmark, click here. Custom contact fields let you build contact lists based on the data within their fields.
Video Overview
Need assistance before exporting? Click here to schedule a one-on-one session with a Benchmark Email expert.
Exporting Benchmark Classic Contacts
To get started, follow the steps below.
- You'll first need to log in to your Benchmark Classic account.
- Open the Contact's dashboard and select the contact list you want to export.
-
Select the More Options menu and click on Export File.
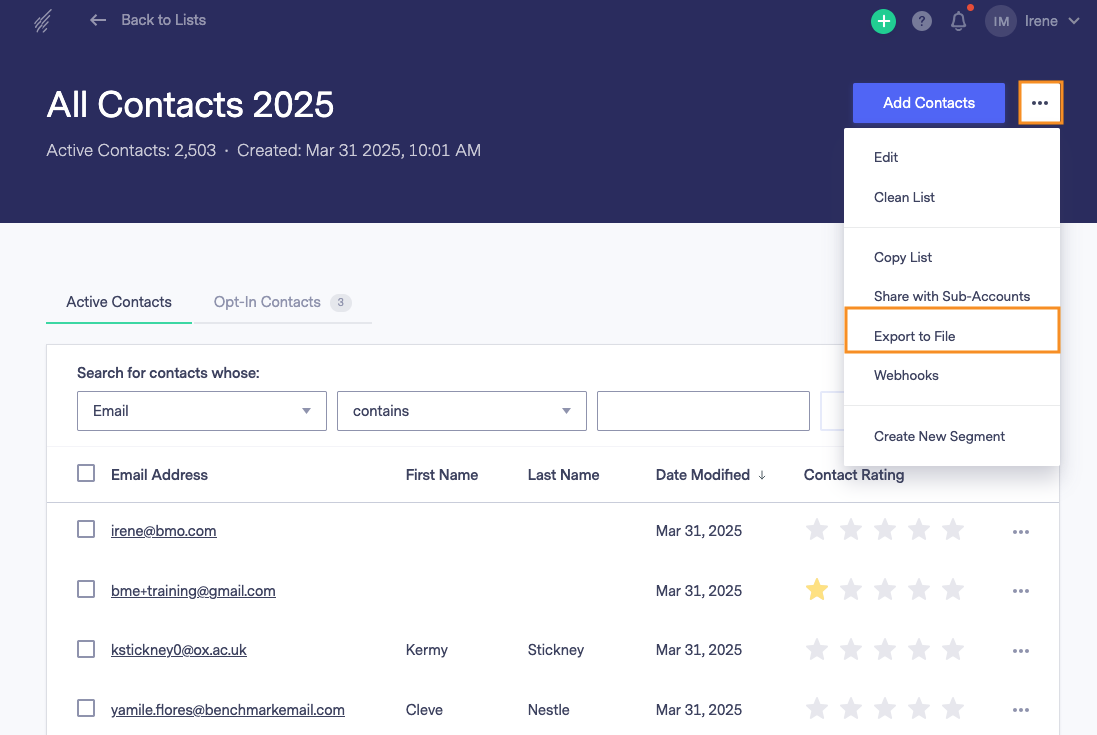
- In the Contact Filter Options, select the type of emails you want to export. We recommend choosing Active Emails.
- Then, choose which fields you want to export or choose Select ALL to export all data collected via Benchmark Classic.
- Lastly, select the Download CSV option. The file will now be saved to your computer.

Import a File of Contacts to the New Benchmark
To import your Benchmark Classic lists into the New Benchmark, follow these steps.
Contacts are stored differently in the New Benchmark application. In the New Benchmark, contacts are kept in one main database, while in Benchmark Classic, they are stored across one or multiple contact lists. Contact Lists in the New Benchmark are segments of contacts defined by specific criteria.
For more information on importing contacts and creating lists in the New Benchmark, click here.
- Log in to your New Benchmark account.
-
Click on Contacts.
Please note that you can not import contacts from the List page.
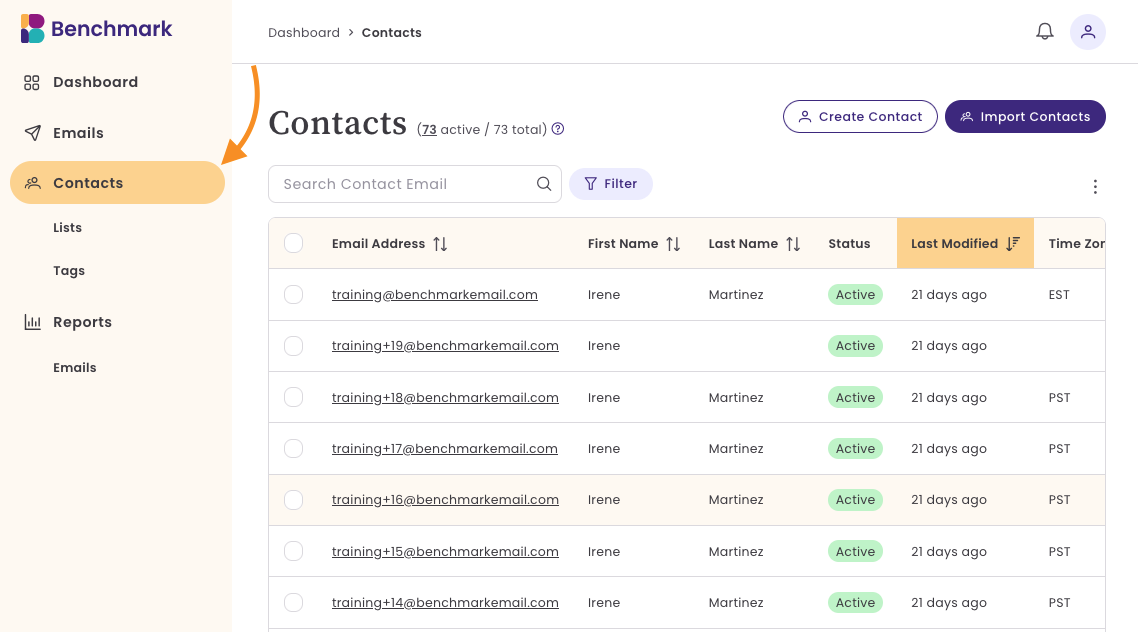
-
Select Import Contacts, click on the file option, and select your CSV. file. You can also drag in the CSV. file from your computer.
- Map your existing contact fields and ignore columns you'd like to skip.
-
To map each field, click on the dropdown option for each column and assign a contact field to the data. You can also create a new contact field from the dropdown.
-
- Organize your contacts by adding them to a contact list or by adding tags to the contacts being imported.
- To add contacts to a list, click on the dropdown and select an existing list or create a new contact list. To create a new list, Type in a list name and then click +Add.
-
To add a Tag, click on the dropdown and select an existing tag or create a new tag. To create a new tag, type the name of the tag and then click +Add.
- Review your import details, here you'll get a summary of your list import.
- The Contact file name.
- Total records (contacts) in the file.
- Records Skipped, any invalid emails.
- Contacts to Import.
- Lists
- Tags
- Existing Contacts Found. Total contacts already existing within your account.
- Update any existing contacts. If you update information for existing contacts, any old data will be replaced. If you skip this option, their data will not be imported.
- If everything looks correct, select Begin Import.


Import in Progress: Depending on the size of your file, importing it may take a few minutes.
Do you still have questions? Email us, and one of our email experts will contact you.